Building A Web Application To Handle POST Requests With Python, Flask And LIFX API
In this post, I will discuss the steps I took to make my own LIFX web application using the Flask web framework.
This is a follow up post from last week, but you can download the repo. To recap, we used the Python and the LIFX API to control different requests sent to our wifi-enabled lights. In order to create an application we have to look at all the components. I usually start with a rough sketch or a whiteboard.
Here’s my whiteboard (don’t judge…):

Now this can seem like a lot, I draw these out to see what needs to happen on the front end for the user, and also what needs to happen on the backend to make the magic happen. We can’t forget about how the two ends communication.
So since we already have the python file to handle the API requests for our preset lights, we will start by building the webpage. The beauty of Flask is that we can reference our python code from the html page. I will use the title and the lifx_id as two variable I will send from the server. For example, when the page loads, I would like to title to also load, and initialize a variable to store the user’s API Key.
The Flask framework will allow you to reference pythonic code using the following syntax :{{ code }}. I am wrapping python code in html here:
<title>{{ title }}</title>I used some .css to make the page look better, and also used multiple buttons on a form to submit different request. We can also use a cool Flask method call url_for, which is great way to reference the different links or pages you create.
I used the pythonic url_for inside the html form attribute, form action.
<form action={{url_for('index')}} method="POST">
<button type="submit">LIFX App</button>
For example, since I only want buttons shown, I can create a button that links to the index. A circular reference to reload the page, but in my case, I would like to save the input from the form, and also return in to the form. This way the user does not have to enter their API key more than once.
Below I reference the lifx_id and the url_for a specific route called on. We will revisit this when we are building out the server.
<label for="lifx_id">Enter your LIFX key..</label>
<br>
<input type="text" id="lifx_id" name="lifx_id" style="width:33.3%" value={{lifx_id}}>
<button type="submit" formaction={{url_for('on')}}>Power ON</button>
Here’s my full code to handle all different routes:
<html>
<head>
<title>{{ title }}</title> <style>
.btn-group button {
background-color: hsl(187, 52%, 80%); /* Green background */
border: 1px solid powderblue; /* Green border */
color: white; /* White text */
padding: 10px 24px; /* Some padding */
cursor: pointer; /* Pointer/hand icon */
width: 55%; /* Set a width if needed */
display: block; /* Make the buttons appear below each other */
} .btn-group button:not(:last-child) {
border-bottom: none; /* Prevent double borders */
} /* Add a background color on hover */
.btn-group button:hover {
background-color: rgb(44, 130, 141); </style>
</head> <body>
<div class="btn-group" style="height:100%">
<form action={{url_for('index')}} method="POST">
<button type="submit">LIFX App</button>
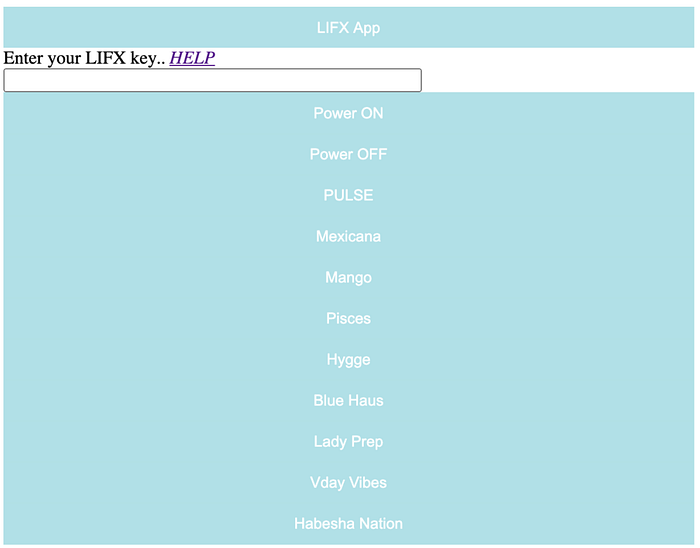
<label for="lifx_id">Enter your LIFX key.. <i><a href="https://api.developer.lifx.com/docs/authentication" target="_blank">HELP</a></i></label><br>
<input type="text" id="lifx_id" name="lifx_id" style="width:33.3%" value={{lifx_id}}>
<button type="submit" formaction={{url_for('on')}}>Power ON</button>
<button type="submit" formaction={{url_for('off')}}>Power OFF</button>
<button type="submit" formaction={{url_for('pulse')}}>PULSE</button>
<button type="submit" formaction={{url_for('mex')}}>Mexicana</button>
<button type="submit" formaction={{url_for('mang')}}>Mango</button>
<button type="submit" formaction={{url_for('pis')}}>Pisces</button>
<button type="submit" formaction={{url_for('hyg')}}>Hygge</button>
<button type="submit" formaction={{url_for('blu')}}>Blue Haus</button>
<button type="submit" formaction={{url_for('lad')}}>Lady Prep</button>
<button type="submit" formaction={{url_for('vda')}}>Vday Vibes</button>
<button type="submit" formaction={{url_for('hab')}}>Habesha Nation</button>
</form>
</div>
</body>
</html>
Now that we have this fancy website, how can we make these buttons work? That’s where the back-end comes in. This means that we need some kind of rules or instructions for our websites to handle actions from the user. For example, if I want to turn the lights on, I would click the turn on lights button; and the lights should come on.
Since we already have a class to handle that type of request, we will need a rule, what we will refer to as a route, for this user’s action to take. We will need a number of these rules. The most simple route is to handle when someone visits our web application. Should they be directed to a certain page? This is the importance of the back-end server. It servers requests.
We start by importing the required python libraries:
from flask import Flask, render_template, request, redirect, url_for
from LIFX import LIFX
Then we can define the app, the api handler, and the routes for each one of our user actions. To begin, we will create a route that will load the html page, and the title, and a variable to store the user’s api key.
app = Flask(__name__) # app
lifx = LIFX() # api handler
@app.route('/', methods=["GET","POST"]) #route for homepage
@app.route('/index', methods=["GET","POST"]) #index route
def index():
    return render_template('index.html', title='LIFX App', lifx_id="")
We used the render_template method to load our html_page from above with the title and the empty lifx_id variable. We reference this page from the html page using url_for('index'), as we do the same for each route.
render_template('index.html', title='LIFX App', lifx_id="")So here’s the full server code:
from flask import Flask, render_template, request, redirect, url_for
from LIFX import LIFXapp = Flask(__name__) # app
lifx = LIFX() # api handler@app.route('/', methods=["GET","POST"]) #route for homepage
@app.route('/index', methods=["GET","POST"]) #index route
def index():
    return render_template('index.html', title='LIFX App', lifx_id="")@app.route('/on', methods=["GET","POST"])
def on():
    message = request.form.get('lifx_id')
    print(type(message), message)
    lifx.token = message
    print(lifx.token, type(lifx.token))
    lifx.power_on()
    return render_template('index.html', title='LIFX App', lifx_id=message)@app.route('/off', methods=["GET","POST"])
def off():
    message = request.form.get('lifx_id')
    print(type(message), message)
    lifx.token = message
    print(lifx.token, type(lifx.token))
    lifx.power_off()
    return render_template('index.html', title='LIFX App', lifx_id=message)@app.route('/pulse', methods=["GET","POST"])
def pulse():
    message = request.form.get('lifx_id')
    print(type(message), message)
    lifx.token = messageapp = Flask(__name__) # app
lifx = LIFX() # api handler
@app.route('/', methods=["GET","POST"]) #route for homepage
@app.route('/index', methods=["GET","POST"]) #index route
def index():
    return render_template('index.html', title='LIFX App', lifx_id="")app = Flask(__name__) # app
lifx = LIFX() # api handler
@app.route('/', methods=["GET","POST"]) #route for homepage
@app.route('/index', methods=["GET","POST"]) #index route
def index():
    return render_template('index.html', title='LIFX App', lifx_id="")
    print(lifx.token, type(lifx.token))
    lifx.pulse()
    return render_template('index.html', title='LIFX App', lifx_id=message)@app.route('/mex', methods=["GET","POST"])
def mex():
    message = request.form.get('lifx_id')
    print(type(message), message)
    lifx.token = message
    print(lifx.token, type(lifx.token))
    lifx.mex()
    return render_template('index.html', title='LIFX App', lifx_id=message)@app.route('/mang', methods=["GET","POST"])
def mang():
    message = request.form.get('lifx_id')
    print(type(message), message)
    lifx.token = message
    print(lifx.token, type(lifx.token))
    lifx.mang()
    return render_template('index.html', title='LIFX App', lifx_id=message)@app.route('/pis', methods=["GET","POST"])
def pis():
    message = request.form.get('lifx_id')
    print(type(message), message)
    lifx.token = message
    print(lifx.token, type(lifx.token))
    lifx.pis()
    return render_template('index.html', title='LIFX App', lifx_id=message)@app.route('/hyg', methods=["GET","POST"])
def hyg():
    message = request.form.get('lifx_id')
    print(type(message), message)
    lifx.token = message
    print(lifx.token, type(lifx.token))
    lifx.hyg()
    return render_template('index.html', title='LIFX App', lifx_id=message)@app.route('/blu', methods=["GET","POST"])
def blu():
    message = request.form.get('lifx_id')
    print(type(message), message)
    lifx.token = message
    print(lifx.token, type(lifx.token))
    lifx.blu()
    return render_template('index.html', title='LIFX App', lifx_id=message)@app.route('/lad', methods=["GET","POST"])
def lad():
    message = request.form.get('lifx_id')
    print(type(message), message)
    lifx.token = message
    print(lifx.token, type(lifx.token))
    lifx.lad()
    return render_template('index.html', title='LIFX App', lifx_id=message)@app.route('/vda', methods=["GET","POST"])
def vda():
    message = request.form.get('lifx_id')
    print(type(message), message)
    lifx.token = message
    lifx.vda()
    return render_template('index.html', title='LIFX App', lifx_id=message)@app.route('/hab', methods=["GET","POST"])
def hab():
    message = request.form.get('lifx_id')
    lifx.token = message
    lifx.hab()
    return render_template('index.html', title='LIFX App', lifx_id=message)if __name__ == '__main__':
    app.run(debug=True)
Now that we have a web page for our users, a backend to serve our user’s requests, we can export our requirements file, templates, and application files. Since I will be using pythonanywhere, I can either create a new application and clone my repo from github, or I can upload the files.
**Please note, that I updated the LIFX.py file to have methods for each request in my pre-saved settings. If you would like to use your LIFX presets, please update the LIFX.py file accordingly**
Be sure to save the requirements file:
pip freeze > requirements.txtHere are the steps I took to upload the application to my account:
- Created a free account here
- Go to Console:
- Start a new bash console
- Create a virtual environment
git cloneyour application repositorycdinto your repository- Install requirements
3. Go to Web:
- Create
new web app - Select
configure manually - Select
python version - Set
Pathto virtual env - Set
Pathto source code
4. Open WSGI configuration file:
- Comment out or delete “
Hello World” section - Uncomment “
Flask” section - Set
Pathtoapplication path - Edit to import
your applicationasapplication
If you require more assistance here, PrettyPrinted has a good youtube tutorial on deploying your Flask app to python anywhere.
Here is the link to the application, and the repo.
Thank you for reading. Now I can just go to a website and change my lights, turn them on or off. I hope this is helpful to someone out there starting to learn python!!!